


Why Should You Regularly Get Your Direct Ophthalmoscope Serviced By A Keeler Specialist?
A direct ophthalmoscope is the most utilised instrument in an optometrist’s tool chest. It’s used every hour of every working day. In fact, any optometrist will tell you they cannot work without an ophthalmoscope, it would be the equivalent of asking an Olympic swimmer to swim in a pool with no water, it’s simply not possible!
At the same time, it’s also the most neglected instrument when it comes to maintenance and up keep. This is where the problems usually starts. If you were to ask any optometrist when the last time they had their instrument serviced, the answer will almost certainly be “never” or “when it last broke down”.
For many the story almost certainly starts like this….
I bought my first Keeler Specialist Direct Ophthalmoscope when I went to university to study optometry. I graduated and have used it in my professional life ever since.
Over the years I have found it’s not as bright as it once was, there are bits of dust and specs of makeup (among female optometrists) on a number of lenses and the odd eye lash gets stuck and I can’t get in out. I’ve even tried to use a cotton swab but the mirror often ends up getting cracked).
Unfortunately, there is no escaping issues like this as they arise from general wear and tear.
Here we cover the essentials for you to consider.
I Have Never Opened The Ophthalmoscope. How Could It Possibly Get Dusty?
To explain why this happens we need to temporally deviate from the topic for a moment.
Let us take an example of a television screen. (I will keep this as simple and straight forward as possible)
Typical Scenario:
You take a dry cloth and clean a television screen by doing so you clean the screen of course but electrostatically charge the screen with a positive charge. Due to the inverse square law, the force of attraction is more than the repulsion as the negative side is closer and the particle experiences a net force towards the screen. In simple terms, the positively charged television screen is attracting the negatively charged dust particles and this is why dust often accumulates on television screens very quickly.
Now back to the ophthalmoscope example….
The principle is exactly the same because the manufacturer will clean and polish the glass prior to assembling your ophthalmoscope. The causes the glass to become positively charged and the dust particles being negatively charged.
How Bad Can It Really Get?
Don’t just take our word for it, have a look for yourself!
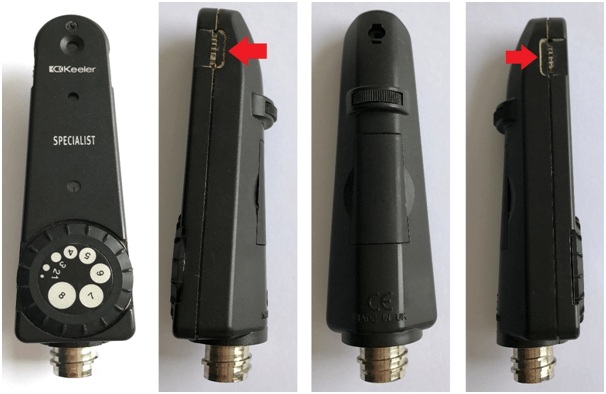
Below is an image of the current Keeler specialist direct ophthalmoscope head. This is the model with the new blue filter. The particular device is roughly three years old.
From the outside its looks like it’s in good shape; perhaps a few odd cosmetic imperfections from day-to-day use and some dirt and grim. This indicated by the red arrows. However, nothing indicatesthat it’s been ill-treatedor damaged.
However, looks can be deceptive. Let’s take a closer look!
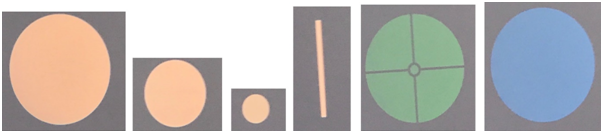
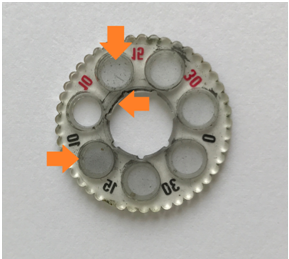
A quick run through the graticule control and our filters show dirt and debris contained within the ophthalmoscope.

Note: These are graticule control images before the instrument has been serviced
Examining a patient with an instrument in the above condition would make it very difficult for an Optometrist to clearly determine if the patient has something wrong with their eye or whether there are foreign particles inside their ophthalmoscope.
If we go onto look at the images below, after an ophthalmoscope has been serviced and cleaned we can make a distinct comparison of the graticule control and filters.
Note: These are graticule control images after the instrument has been serviced
Immediately we can see a difference in the images.The graticule control and filters are a lot cleaner. The illumination from the device is also significantly brighter. It’s now an instrument that is far more usable. An Optometrist can now make a clear diagnosis when examining a patient.
Breaking This Down Into Further Detail
To illustrate this in greater detail let’s look at a text book example an optometrist is likely to suffer.
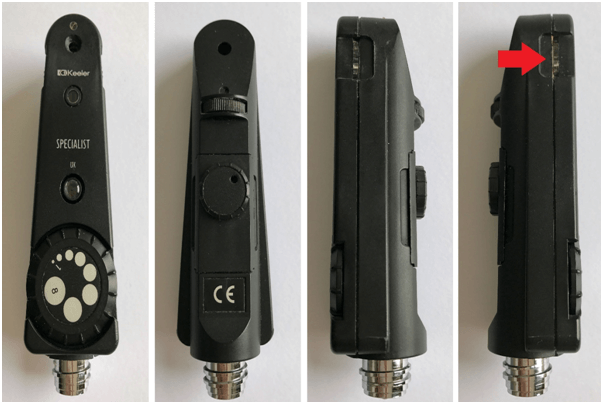
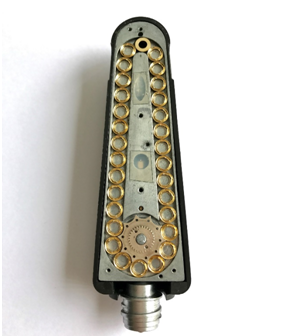
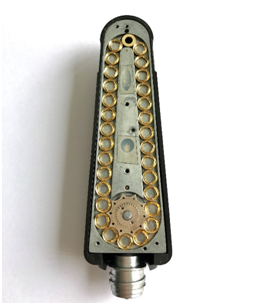
Below is an image of a Keeler specialist direct ophthalmoscope. This is the older model because it has the green filter. The owner of this instrument has owned and been using it for 10 years and it’s never been serviced before.
From an external examination it doesn’t look too bad. Some cosmetic signs of wear and tear and a little bit of dirt around the edge of the power lenses (indicated by the red arrow) but nothing out of the ordinary.
Note: Images of the physical instrument before service
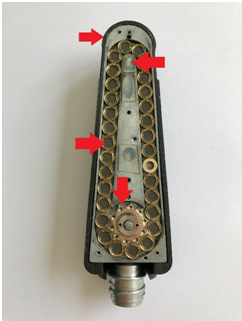
When we look inside the ophthalmoscope you can immediately see that there some foreign particles on the graticule control ranges and filters. This is indicated by the red arrows. But, on closer inspection we can see that this is not the whole picture. When it’s examined through the view finder there are clear signs of dust and debris across the individual lenses.

Note: These are graticule control images before the instrument has been serviced
In addition, when using the auxiliary lens wheel to scroll through the power lenses there are noticeable specs of dirt on the lenses (again as you would when examining a patient up close). At this point we would need to open up the instrument to see the true amount of dust and dirt inside.
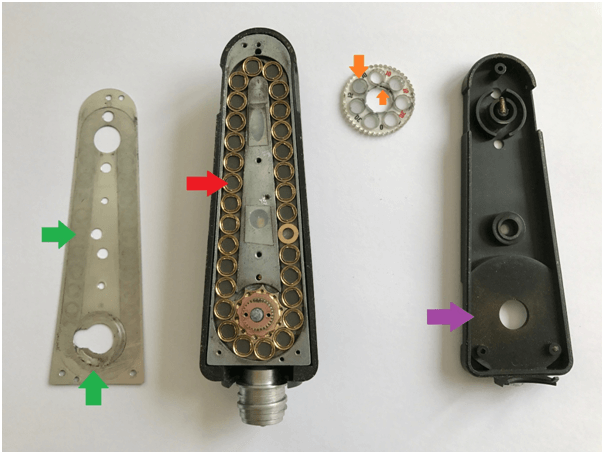
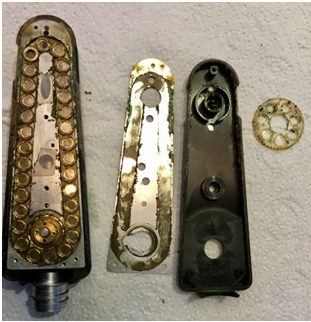
Immediately on opening the instrument you are able to see some basic problems:
- The retaining plate (indicated by the green arrows) which sits on top of the lenses is dusty.
- The glass lenses that sit on the lens rack (indicated by the red arrow) are extremely dusty.
- The ‘power lenses’ (indicated by the orange arrows) have dirt along the edges of the lenses and on the actual lenses themselves.
- The black plastic cover has a noticeable amount of dust that is clearly visible (indicated by the purple arrow).
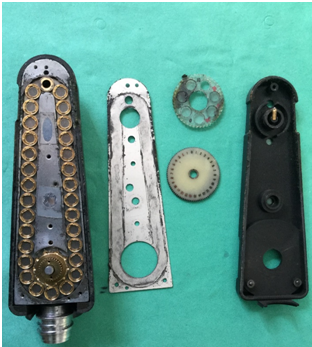
The Specialist Ophthalmoscope Under The Microscope
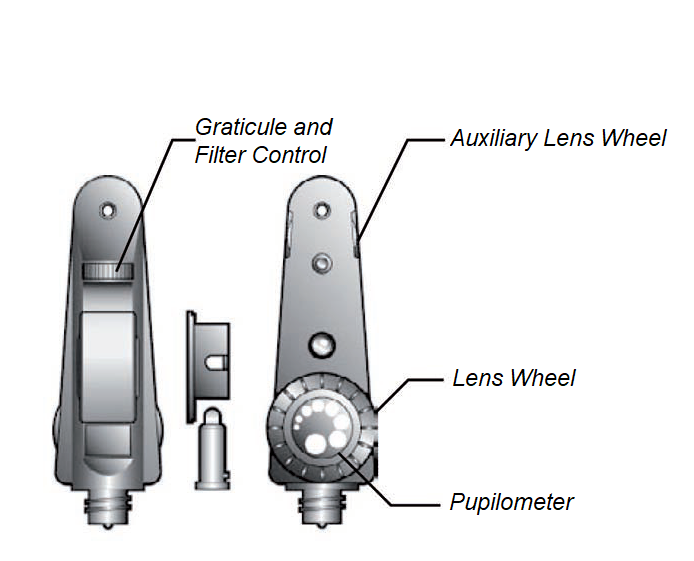
The Head
Looking at the image below, the specialist direct ophthalmoscope has a significant amount of dust on what should be transparent glass lenses. The aluminium frame as well as the edges of the plastic casing are also dusty.
The Power Lenses
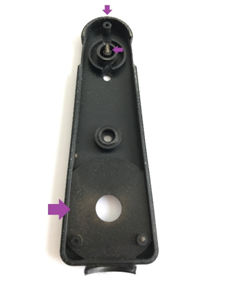
The Back Cover
A closer look at the back cover you can see a noticeable about of dust around the instrument, partially on the edges of the instrument and in the middle.
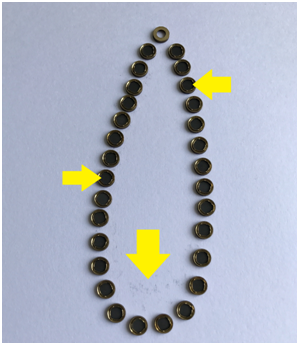
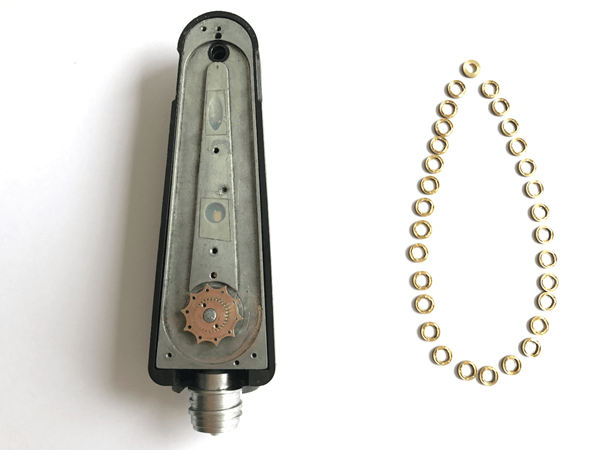
To illustrate just how dirty the lenses are we can take this one step further. Each lens has been placed on a white card
Notice the colour of the lenses are closer to black than they are white and considering the lenses are transparent we should be able to see the white card directly through the lenses.
At the bottom of the image where the lenses are located there are specs of dust on the white card. They directly came of the dirty lenses at the time of placing the lenses onto the white card.
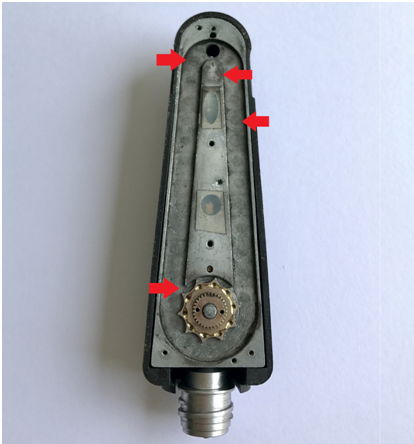
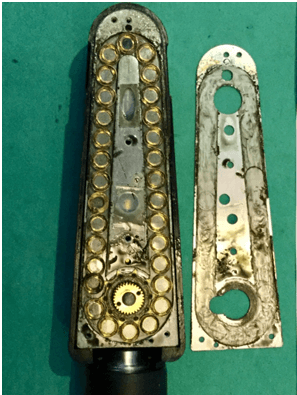
So, what does the actual direct ophthalmoscope look like once the lenses have been taken off?
As you can see from the image below it is rather dirty. Pay closer attention the lens rack on which the lenses sit on. You can see the imprint of the dirty lenses (indicated with the red arrows). Notice the dirt and grim all along the edges of the lens rack as well.
Performing any form of direct ophthalmoscopy with an apparatus in such condition would make it very difficult for an optometrist to diagnose between a specific eye complaint or whether their instrument is simply in poor working order.
Worryingly from on optometrist’s point of view, the example shown above is an instrument we would class as normal when it comes in for service. This is what you would call the best of a bad bunch.
Our Technical Service Team have kindly shared of the horrors that they’ve seen over the years.
The Worst Offenders
These are instruments that have had a tough life and certainly have been neglected up to the point where they have failed while in use and have ultimately come to us for service.
Example 1:
This ophthalmoscope is roughly 10 years old and had never been serviced, not a very pretty sight.
Example 2:
This instrument is roughly 10 years old and had never been serviced before.
But notice how dirty the lenses are. This particular instrument was owned by a female optometrist and the reason for the lenses appearing to be so dusty and dirty is the fact that her makeup gradually made its way into the instrument over the years.The colour of the lenses are, therefore, more on the browner side in colour rather than grey/back as per the examples above.
Example 3:
This instrument also over 10 years old seems to have had a hard life. The image speaks for itself.
Example 4:
This is, by far, the worst offender we have ever come across. Apart from the dirt and dust the instrument had a significant amount of oil acrossthe lenses and holding plate. (This was a nightmare to clean)
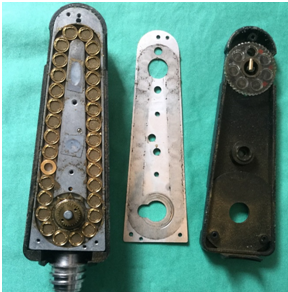
What Is The Difference After A Service?
Now that you know how bad it can really get it's time to look at the brighter side.
The good news is, 99.9% of the instruments we receive for service can be serviced and once you get it back, your guaranteed to see a noticeable difference. Below is an image of the earlier example shown above. The only difference is that they are taken after the ophthalmoscopes have received a full service from our Technical Team.
You can see an immediate difference can’t you. The lenses are clean and you can see the white card on which the instrument and lenses are placed on top of. The aluminium chassis has a noticeable difference too, looking much cleaner.
With the power lenses cleaned, it looks much better and a noticeable difference should be immediate to the user when examining a patient.
Before and After Service!
Once all the lenses are placed back on the instrument you can immediately notice a visible difference in the cleanliness of the instrument. The ophthalmoscope is, in effect, returned to its former glory.
A Side-by-Side Comparison

|
|
|
Before Service |
After Service |
The Graticule Control and Filters
Notice a visible improvement in the illumination of the graticule control and filters after the service.

Before the instrument was serviced

After the instrument has been serviced
Thanks… I Now Know What To Look Out For, I Can Do It Myself!
Before you consider to service your own instrument, let me say that this is a highly ill-advised move. Let me explain why. To illustrate this let’s look at a watch as an example. If are an admirer of exquisite time pieces then you should look no further than to one of Switzerland’s biggest exports, the watch.
A lot of time (apologises for the pun) and effort goes into designing and manufacturing them. Equally, the same amount of attention to detail is paid when putting it back together by a master watchmaker. It is done so in a very precise order as, at the end of the day, it must all fit together into the enclosure that makes up the watch.
In principally, the specialist ophthalmoscope must be opened and taken apart in a very particular sequence. Bear in mind that:
- The ophthalmoscope has more than 40 lenses (in total) of which none are labelled or marked, not to mention which ones are positive (+) and which ones are negative (-)
- The lenses on the rack and not fixed in place or screwed on, simply just rest on top
- The power lenses (individual lenses) are not labelled or marked not to mention differentiating between the positive (+) and negative (-) lenses
- The mirror is very small (smaller and thinner than a nano sim card) brittle and prone to damage if not handled correctly
Getting any of the steps wrong would make it a nightmare putting the instrument back together. This list above highlights a handful of things that need to be considered when taking apart the instrument. There are a lot more but I’m keeping it simple.
The cost of repairing the self-inflicted damaged can often result it a costlier repair than what it would have cost if you had simply got it done professionally.
Advice Taken and Noted. But How Do I Know If My Instrument Needs Servicing?
Most of what has been discussed so far has covered what happens when you neglect your instrument and the repercussions of that. Now it’s time to cover the proactive approach to help you determine if your instrument really does need a service.
The Nine Most Common Problems Optometrists Experience With Their Direct Ophthalmoscopes:
Our customers tend to suffer from the following issues:
- Dust particles, eye lashes and makeup often settle onto the lenses and filters. This is often noticed when examining a patient
- The lens rack does not click into position any more
- The lens rack is very stiff to turn (you require using more force to turn the wheel than you previously used to)
- The lens rack has sized or stuck in one position (It doesn’t turn in either direction)
- The illumination is very dim (compared to a brand-new instrument, even after changing the bulb)
- The illumination is intermittent (the light flickers and the illumination is not constant)
- The mirror seems to have dislodged and the beam of light no longer shines in the right place
- The mirror is broken and I can see anything at all.
- The instrument was dropped and nothing works
Assuming your instrument has received a thorough service you should immediately notice a number of improvements:
Physically on The Instrument
If the instrument has been serviced properly then the instrument casing should have also been thoroughly cleaned. There shouldn’t be any makeup or oil residue.
Pay close attention to the corners (in particular where the auxiliary lens wheel is located) where dirt and grim usually does get stuck and requires a little bit more elbow grease to clean up.
Power Lenses and Filters
Take your specialist ophthalmoscope and turn it on. Shine the instrument against a white background such as a clean sheet of white paper or card. This will enable you to see if it really is clean.
Hold the instrument roughly one foot away from the white sheet of paper and make sure the room is a little darker than usual. The scroll through all the graticule control ranges and filters using the auxiliary lens wheel. When doing so keep an eye out for any strands of hair / dust particles or any other potential residues, this will immediately show up.
Lens Rack
Hold the instrument as you would when examining a patient and scroll through the lenses using the lens wheel. Make sure that the wheel still clicks in place as it should (it will be a very soft gentle click and you will feel this in the finger).
Pay particular attention to how much effort is required to turn the wheel. A correctly serviced instrument would require very little effort to toggle between the lenses. If it feels little stiff, chances are it probably wasn’t serviced correctly.
Illumination
The most important aspect of the entire instrument. The illumination should be constant and visibility brighter. It should not flicker or be intermittent. The perfect test before you use it, look for any pieces of paper you may have lying around your office or at home with terms and conditions listed on it which are usually in very fine print. The smaller the better.
Take your specialist ophthalmoscope and examine the paper like you would for a patient’s eye and try and read some of the fine print from the document.
Immediately you should notice a difference (in illumination and clarity). The words should be much easier to read with more light passing through the clean lenses.
Keep scrolling through the lenses keep an eye out for any visual marks you may see from the refection such as smear or smudge marks from a cleaning materials or liquids that may have been used to clean the lenses (they should of course not be there).
Assuming you have given your instrument a clean bill of health and all of the above are okay, you can walk away knowing you instrument has been given a good service.
How Do I Shortlist A Company To Check and Repair My Ophthalmoscope?
This is the single most important question that needs to be addressed. Here are some tips on how best to narrow down your list.
- Word of mouth is still one of the most powerful forms of recommendation. Ask a friend in the industry or colleagues if they have ever used any of the companies you have shortlisted. Probe them about their professionalism, quality of service and turnaround times.
- We live in a connected world and the internet is a beautiful resource. Have a look at the companies’ social media accounts such as Facebook or any other platform. Do they have any customer feedback listed? What’s the verdict from real people who have used their service in the past? This likely to give you a good indication of the level of service you are likely to receive.
- Have a look for any content material such as newsletters, blog posts or contributing guest articles on industry related websites. Their depth of knowledge will give you an idea of their expertise and competency.
- What type of ‘service’ does the company provide:
- A basic service e.g. cleaning just the lenses andfilters?
- Can any broken or damaged parts be replaced and repaired or do you offer service exchange for a new instrument? (Usually a very costly exercise)
- Are parts inclusive or extra on top of the base price? (If so what would be the maximum cost of the repair?)
- Is there any option for a full service with a fixed price?
- This means one price to fix everything that could have gone wrong with the instrument.
- Are the parts inclusive in the cost or extra?
- What is the expected turnaround time for the service?
- How much will it cost? We understand that many of you may want to get it serviced for the cheapest price possible. It seems reasonable enough and besides, everyone has a budget. However, consider this…. if you go for the ‘cheap and cheerful’ route you do not have any guarantee that the service will be carried out correctly. It also doesn’t mean that it’ll be carried out by a knowledgeable and reputable company. In short you get what you pay for.
- What level of serviceyou will get? When would you find time to send it out again assuming the ‘cheap and cheerful’ option didn’t work out the first-time round? Is the extra cost worth the reassurance and peace of mind? From our experience it’s always worth paying a little bit more to get the instrument serviced properly. It mitigates against the risk of encountering issues and additional inconvenience further down the line. After all, you work five or six days a week and the weekends are most probably your busiest time’. Don’t lose out on this income stream.
- If in doubt then give them a call. If they want your business they will undoubtedly go out of their way to address any concerns or queries you may have.
The Unintended Consequences of A Poor Choice The First Time Around
So you’ve had to send your instrument back to be serviced again. This obviously wasn’t planned as so you don’t have a backup to use. The hassle you have incurred has ultimately cost you more money that it should have.
Seeing as you have paid twice for the job plus all the business that you have lost out on. If you had elected to pay a little bit more the first time around this would have all be avoided.
At the end of the day, as the end user you will have to prioritise what it important to you first and make a decision accordingly.
Here at Brawn Ophthalmics we offer a fixed price service on all Keeler specialist direct ophthalmoscopes repairs. This is an all-inclusive service with parts and labour with turns around times no later than five days from date of receipt.
When Is The Right Time To Send My Instrument In For Service?
The short answer… it’s up to you! Most optometrists will choose to send in their ophthalmoscope for service when one of the following applies:
- You can secure a loan instrument from your practice to use whilst your instrument is getting serviced
- You can borrow an instrument from a friend or colleague
- You have a spare instrument to use
- You’re taking a holiday soon and decide it would be a great time to get your instrument serviced
- Or simply when it most convenient to you
Your direct ophthalmoscope is a vital tool to examine your patients. Any day that you do not have it ends up being a day you are unable to see patients. This inevitably means a loss of revenue to your practice.
Conclusion
You’ve now seen how bad things can get when your direct ophthalmoscope is neglected.
Take the proactive approach. Test your instrument and go through the check list on ‘what to look for’.
If you feel you need some advice or would like to chat to our team get in contact with us and a member of our team will get back in touch with you shortly.
Disclaimer: All images used in this article are real life examples of ophthalmoscopes owned and used by optometrists.To give you a fair and impartial representation, no photo editing software, tools or filters have been used or applied to any images. All photographs have been taken in their natural environment.